NSIS是一个功能强大的安装卸载包制作工具,通过dll可以扩展很多功能,你也可以自定义一个dll,以下是具体步骤:
1.新建一个mfc dll(本例Hello.dll)
1.1 添加对nsis库的引用:
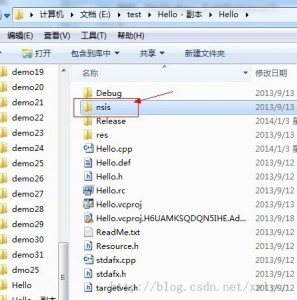
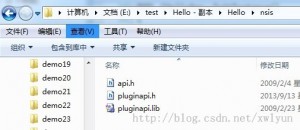
在Hello.cpp中声明对nsis库的引用:
// Hello.cpp : 定义 DLL 的初始化例程。
//

#include "stdafx.h"
#include "Hello.h"

#include <windows.h>
#include <stdio.h>

// 生成的dll放置在NSIS\Plugins下
// 项目属性->配置属性->链接器->输入->忽略特定库: LIBC.lib(解决无法打开libc.lib的错误)
#include "nsis/pluginapi.h" // nsis plugin,需要拷贝nsis的库文件
#pragma comment(lib, "nsis/pluginapi.lib")
#define NSISAPI extern "C" __declspec(dllexport) void __cdecl //C,避免nsis脚本重定义函数名
1.2 完成一个用来测试的方法:
/*
 * 在nsis脚本中调用方法myPlugin::myFunction /NOUNLOAD $2
 * /NOUNLOAD 表示调用完此方法后不卸载这个dll,用于保存dll的数据
 * hwndParent:安装窗口的句柄
 * stacktop:nsis传入的参数堆栈, 通过popint/popstring 可以取出来
 * extra:插件里面调用script的函数就需要用到这个
 */
NSISAPI TestFunc(HWND hwndParent, int string_size, char *variables, stack_t **stacktop, extra_parameters *extra)
{
 EXDLL_INIT(); //初始化,方法开始位置必加

 char sParam[MAX_PATH];
 if(popstring(sParam) == 0)
 {
 CString str;
 str = sParam;
 AfxMessageBox(str);
 }
}
2.新建一个hello.nsi来测试我们的dll是否可以被调用成功
nsis脚本:
OutFile "Test.exe"

Section
 Hello::TestFunc /NOUNLOAD "hello nsis dll"
SectionEnd
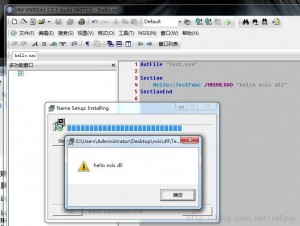
编译运行,调用成功效果如下:
© 版权声明
THE END





暂无评论内容